Tuesday, October 6, 2009

New Fence, New Fence


Two weeks before C's parents arrived the landscapers called to say that they would like to remove the old chain-link and set the new posts starting the next day. We swiftly hacked away at the tangle of overgrown shrubs, sapling and vines that made up our "garden", creating a pile of brush taller than a person. The posts were set over the next 10 days(!), the fence wood was delivered and C's parents arrived. Forecast for their visit....rain every day! The sloping backyard was a challenge, but 6 days later and plenty of caked on mud, the fence is built. Gates will be tomorrow's task.

Old Fence, New Fence


In preparation of C's parents coming to build the new fence, we pried off all the old fence boards that were attached to the chain-link, hammered out the old nails, took the split boards and cut them down, then hatchet-ed the bits into kindling. All in all a very hands-on day. I felt a bit like a pioneer because once all the outdoor work was done, I headed to the kitchen to do some canning!

New Shed, New Shed


Once the old shed was gone, we pulled down the fence boards, which turned out to be beautifully aged cedar. We ordered a cedar shed kit (Outdoor Living), waited 3 weeks for it to arrive and got to work! It was sort of like a very lengthy Ikea construction that required more tools. Also, some of the trim plan was crappy, so it meant a lot of fiddle-y cutting and building. I installed the doors...first attaching all the hinged upside-down!

Old Shed, New Shed


C's parents planned a "working visit" for the Fall and it was decided that they would come and help build us a fence. In order to accommodate the new fence, the old shed needed to be torn down (it was in the way of a stretch of old fence boards that were attached to the existing chain-link fence). Of course, a new shed was needed and had to be smaller as the new fence was going to be built along our lot line. Hence, old shed out, new shed in. The existing metal shed was constructed to last and took 4 hours to dismantle.

Tuesday, July 14, 2009

Basement Project: Camping Storage Closet


Yes, we have such an abundance of outdoors equipment that it needs it's own storage closet.  
Our first basement project:  We started by pulling down the aging ceiling drywall, then used closed cell 1 inch foam on the floor followed by 1/2 inch plywood subfloor.  Then we insulated the outside wall with more foam and Roxul.  C. framed out the closet and we drywalled it, she mudded and sanded it and I primed and painted it.  We had leftover vinyl tiles from our old house kitchen reno that we used in the closet, but laid them like ceramic tiles with spacers and "grout".  I LOVE this closet!   

Updates and Randoms


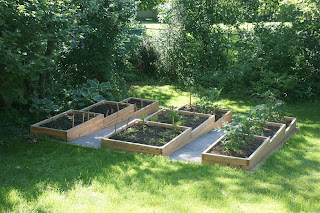
The summer has been busy with work (lots) and play (little).  Here's a more recent photo of our growing garden.  Also, C built an ingenious frame that attaches to the car roof rack so that we can buy whole sheets of drywall and transport it ourselves.  

Monday, June 1, 2009

Patio


The backyard patio is a mix of interlocking pink brick and concrete.  There is also this odd altar type structure that has an electrical outlet on the one side.  We suspect that it used to house a light-up Virgin Mary.  I don't think that I have a good "before" shot, but here it is mid-deconstruction and then again  without the altar.  By the way, the electrical wire was buried bare (no conduit) about 4 inches in the soil.  I just yanked on it and the whole thing came above ground.  I'm sure glad I didn't attempt to edge the lawn and electrocute myself.

Virginia Creeper


We researched native vines and discovered that Virginia creeper might grow in shade and eventually grow up the wooden slats that we have yet to build.  We found some Virginia creeper growing in our backyard and planted some in our carport planters.

Ugly garland gone


It took all of 30 minutes to unscrew the fence, roll it up and cart it off to the dump.  Some time in the near to distant future we plan to add horizontal wooden slats to keep snow out in Winter. 

The carport remodel: Stage 1


The carport on our new house has this hideous woven synthetic Christmas tree stuff that we discovered was full of mosquitos.  It is chain-link fence with wired Christmas garland through it. 

Monday, May 18, 2009

Project 2: Tiered, Terraced Garden Boxes


Boxes built! Yahoo!

Project 2: Tiered, Terraced Garden Boxes


Step Two:  Building the boxes...this took two full days!  

Project 2: Tiered, Terraced Garden Boxes


We decided on splurging and building the boxes in cedar instead of the standard pressure-treated wood.  This way we won't be leaching toxic chemicals in the the soil that will grow our vegetables.  The building of the boxes happened on a rainy, stormy day...but, now that we live in a bungalow with a car port...you get the picture...the building continues despite the weather. 

Project 2: Tiered, Terraced Garden Boxes


We need a sunny place to plant a vegetable garden, so we decided to get in gear for this year and build some raised beds.  Step One (after design and staking out a square plot) was to de-sod a large square of grass.

The "after" carpet removal

Saturday, May 9, 2009

Carpet Removal


We've been itching to tear something out and decided on an easy project.  There is this plush and disgusting trail of carpet leading from the front door, through the hallway, down the back steps to the back door that continues down to the basement.  Note the scalloped edging...classy.  We took a peak when we were first viewing the house and decided that it was subfloor underneath:(  We resigned ourselves to having to live with bare, scalloped edge plywood floors (maybe we'd paint them?) until we were ready to redo the floors on the whole main level.  However, when we peeled back the layer of underpadding (equally disgusting) there was oak strip flooring underneath!  We discovered and removed vinyl tile that was hiding under the carpet in the foyer and vintage marmoleum in a lovely speckled brown/teal/pink melange that was under the carpet at the back door.  We thought we'd save the marmoleum for a while..it's almost retro enough to be cool, but crow-barring the tack strips ruined it...so it left as well.  The only bit of carpet left is in decent shape and is in the rec. room.  It will stay until we renovate that room.  The house suddenly smells better....

Thursday, May 7, 2009


Ah... the first post of our blog that will hopefully take us from the purchase of a virtually untouched 1950s bungalow to our completed home.  We searched for the right neighbourhood and house/land combination for nearly a year.  We offered on and lost 3 houses before offering and getting the best house that we had seen in all of our searching.  I was trying to tell myself that losing the other houses was all in some higher housing plan, and now I actually believe that this was the house we were meant to have.
All of this is a HUGE lifestyle change.  We have moved to the 'burbs, something I never thought I would do.  But, this quiet, quaint neighborhood is very appealing and in real world time, we live a 5 minute drive to work or a 15-20minute bike ride from downtown...hardly far by any standards.  Also, the 'burbs in this context is old 'burbs with each house on a large lot with mature trees, lots of green space and plenty of space between houses.  There are still individual mailboxes attached to the houses and there are no crazy rules restricting clothes lines or  requiring us to mow the lawn on a diagonal.